Easter Chicks with the Bird Punch

I had planned to make an exception this week and post a project that would not involve the use of the bird punch, but then I got quite a surprise. I just couldn’t believe it when my Heliconia card was selected for this past week’s featured upload for Splitcoaststampers Stampin’ Up! gallery. Wow! I never expected anything like that to happen! All of a sudden my blog received a welcome avalanche of new visitors interested in seeing different ways to use this punch. I wanted to make it really worth everybody’s time by showing yet another way to use it, and was hoping to post this card earlier, but my days have just been too long and full. Unlike those cuties on my card I’m no Spring chicken, and by the time I could finally sit down and get some stamping done, all I could think of was to hit the pillow.

Well, at least I did manage to get it all done a few days before Easter, and the chicks are so easy to make. Of all the different ways I have used the bird punch, this is the easiest and quickest. So here are all the details and instructions.

SUPPLIES

Stamp Sets: Happy Moments (Sale-a-Bration… only 3 days left), Inspired by Nature (111656), Itty Bitty Backgrounds (114996)

Papers: Very Vanilla, Blush Blossom, Barely Banana textured, Certainly Celery, Sweet Pea Paper Stack (117161, from the Occasions Mini Catalog)

Ink: Barely Banana, Certainly Celery, Rose Regal, Pretty in Pink, Blush Blossom, Basic Brown

Accessories: XL 2-step bird punch, 1/16” handheld circle punch, scallop oval punch (optional), sponges, blender pen, Perfect Polka Dots embossing folder, mini blue dots.

INSTRUCTIONS

The background was stamped on a 2-1/8” x 3-1/2” piece of Very Vanilla, using sponges and the masking technique. The grass is from Inspired by Nature, and the ‘sand grains’ are from one of the Itty Bitty Background stamps. The pink mat is a 2-3/8” x 3-3/4” piece of Blush Blossom that was sponged with Rose Regal. The embossed mat is 5” x 3-3/4” Very Vanilla. The chicks were punched out of one of the Sweet Pea designer papers and sponged in Barely Banana. The flowers were stamped in Basic Brown on Very Vanilla card stock, then colored with a blender pen using Blush Blossom, Pretty in Pink, then Rose Regal. The stems are Certainly Celery and cut by hand. The butterfly was cut out of one of the Sweet Pea designer papers. –I just want to point out that I used the digital download version of the Sweet Pea designer papers, and used My Digital Studio to print just the size or portion of the paper I needed for the chicks and the butterfly –.

THE CHICKS

After punching the body, insert it through the body hole of the punch as shown below. Position it so you get a nice round little belly and just a hint of a tail. If it doesn’t come out perfect, don’t forget the sanding block!

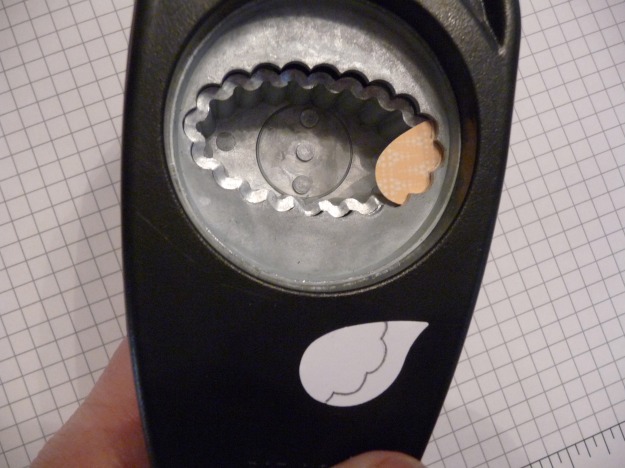
After punching the wing, insert it through the hole of the Scallop Oval punch as shown below. If you do not own this punch, just cut the wing in a wavy manner with your scissors. It doesn’t have to be perfect little scallops.

Snip off just a small part of the beak, making it a little smaller. Sponge with Barely Banana. Punch a hole for the eye with the 1/16” handheld circle punch, then glue a small piece of black card stock right behind that hole. Now adhere the wing with a mini glue dot, and your chick is ready to adorn a card!

THE MASKED BACKGROUND

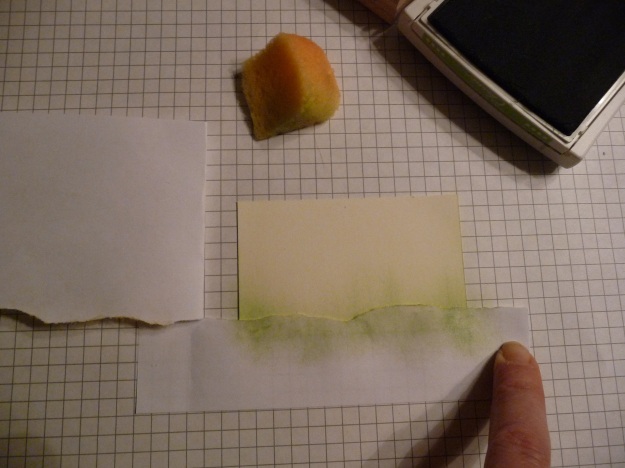
Cut a sheet of paper at least 3″ larger and wider than your piece of card stock. Tear it but not all the way across, keeping a margin that you will use to secure this two-part mask to your work surface. Put a bit of temporary adhesive on the back of your piece of card stock and secure it onto your grid paper. Position your ‘mask’ so that the tear is exactly where you want the cut-off between the ground and the tall grass, and secure it with a piece of tape. Fold the bottom flap back, as shown below, then sponge and stamp.

Then fold back the top flap of the mask and place the bottom flap over the stamped section. Move your piece of card stock up slightly till you see just a hairline of the stamped section — if you omit this you will have a gap between the 2 sections. Now sponge and stamp as shown in the following two photos.

Thanks so much for your interest in my projects. Hope you liked this one… more coming soon.

An Easter Flower with the Bird Punch – A Heliconia

I’m sure you can recognize the bird punch parts very easily in this flower. Very little needs to be done to the punched parts to create a quite realistic looking Heliconia, just a little snip here and there. Then it’s all about coloring. I had in mind to make this a Mother’s Day card, but, when I googled for Heliconia images, I found out that in Hawaii it is referred to as the Easter flower. I just had to make this first one an Easter greeting card. I chose the image of a Heliconia Wagneriana as a ‘model’ because of it’s beautiful Spring colors. The leaf is my own design, and hopefully close enough in appearance to the real thing. You can CLICK HERE FOR THE LEAF TEMPLATE.

LIST OF SUPPLIES

Stamp Set: Teeny Tiny Wishes (115370)

Papers: Whisper White (flower), Very Vanilla, and Certainly Celery card stock, as well as Barely Banana textured card stock

Inks: Certainly Celery, Barely Banara, Rose Regal, Red Rose, Chocolate Chip

Accessories: XL 2-Step Bird Punch (117191), Stampin’ Up Perfect Details Texturz Plate (115962), Big Shot (113439), Sanding Block (103301), Sponge Daubers (102892), Elementary Ribbon Originals (116231), Paper Cutter (104152), Stylus (100663), Everywhere Glue Stick (104045).

INSTRUCTIONS

The punched elements of this 4-1/4″ x 5-1/2″ card are mounted on a 2-7/8″ x 3-1/2″ piece of Very Vanilla card stock, which sits on a 3″ x 3-5/8″ Certainly Celery mat. The greeting was stamped with Chocolate Chip. The embossed mat is 3-3/4″ x 4-7/8″ and trimmed at the bottom with a 1″ x 3-3/4″ strip of Barely Banana textured card stock, that was scored at 1/2″ to fold over the edge (I just like that kind of finish… it’s just like putting a binding on a quilt). The ribbon and bow cover the edge of this trim.

PUNCHING AND COLORING

You will need 5 wings and 3 bodies, all in Whisper White, then color them as illustrated below.

When you color the wings, make sure that you color the correct side to have 2 facing one way, and 3 facing the other.

Before coloring the larger petals, make the following modifications to the bird body. Don’t worry if your cut curves aren’t perfect… a little touch-up with the sanding block will make you look like a pro!

Color the body in the same manner and with the same colors as you did for the wings. Again, make sure you color the correct side of the punched parts to have one that is a mirror image of the other two.

Now you can start putting it all together. First cut a strip of card stock (color doesn’t matter) of 3/8″ x 3″ that will be used as a mounting base. Apply glue liberally (glue stick) and start mounting the petals as shown below, adding more glue as needed.

Before applying the last petal, you will need to snip off the “beak”, and do a little touch-up there with your Certainly Celery dauber. You will also need to cut the excess length of the strip used as mounting base.

Now download the LEAF TEMPLATE, cut it out and sponge it all over with Certainly Celery to darken it, then sponge around the edges. Now score the printed leaf veins with the small end of your stylus and your paper cutter. First, score the center line, then work on the diagonal ones starting from the center line and moving toward the outer edge. Once all the diagonal lines are done, go over the center score line again for a cleaner finish.

Make those score lines pop up with a little more sponging in Certainly Celery. Then cut a 1/4″ x 1″ strip of Certainly Celery for the stalk, and sponge that as well.

Now you can mount all these beautiful flower parts on your card!

Hope you enjoyed this… hope to see lots of bird punch Heliconias!

Happy St. Patrick’s Day Card… with the bird punch

My creative moments may have been few and far between lately, but I did manage to work on 3 fun projects that I’m hoping to have time to share with you over the next few days. I have definitely become obsessed with the 2-step bird punch, and I just keep finding new ways to use it. Below, you will find instructions on how I made the shamrock and flowers with that favorite punch of mine, but first let me give you the list of supplies and the basic instructions for the card.

Stamp Set: Teeny Tiny Wishes

Paper: Certainly Celery CS, Whisper White CS, Certainly Celery Designer Paper

Ink: Certainly Celery, Green Garden, Chocolate Chip, and Lavender Lace pads, plus the Certainly Celery re-inker to stain the micro beads

Accessories: XL 2-step bird punch, flower trio punch, scallop trim border punch, Perfect Polka Dot embossing folder, Big Shot, micro beads, blender pen, sponge daubers

CARD

Emboss a piece of 3-1/2″ x 4-3/4″ Certainly Celery card stock with the embossing folder and Big Shot, then sponge the edges in Certainly Celery. Cut a 5/8″ x 4-1/2″ strip of Certainly Celery, punch with the Scallop Border Trim punch, then sponge, adhere it to the bottom of embossed mat, and trim sides. Adhere the mat to a 4-1/4″ x 5-1/2″ card. Cut a piece of Whisper White card stock 3-3/4″ x 2-7/8″, stamp greeting in Chocolate Chip and decorate with the punched elements.

If you are making the flower, prepare the beaded centers now. Tint about 1/2 tsp. of beads with 1 drop of Certainly Celery ink, mixing well. Then mix half the beads with just enough Crystal Effects so that the beads all clump together. Pick up small clumps, the size of the flower center you want, and transfer them onto a piece of parchment paper. I used my hobby blade to do this. Sprinkle more beads over these small mounds and very gently press them in. By the time you finish the shamrock and flower, the centers will be firm enough to handle but work carefully, they are not completely hardened. Just adhere one to the center of the flower with a small drop of Crystal Effects. You will have enough for a few more flowers.

SHAMROCK

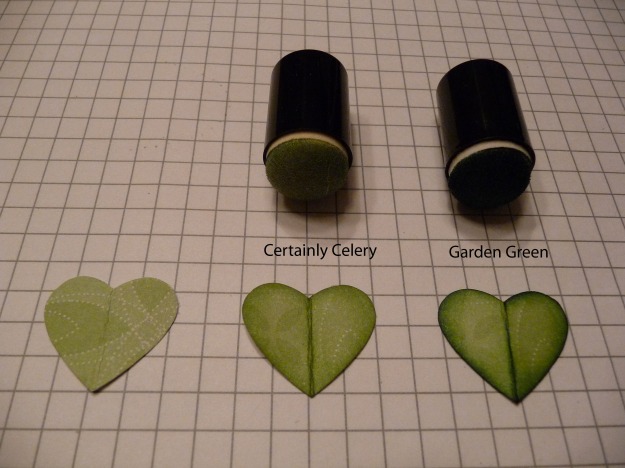
Cut a strip of Certainly Celery Designer Paper about 1-1/2″ x 4″, fold in two lengthwise, then place in the punch as shown in the following illustration and punch 3 heart shapes. Sponge each ‘heart’ with Certainly Celery, then Garden Green. Punch a few branches to make the shamrock and flower stems in the same designer paper. I sponged the stems as well.

WHITE SHAMROCK FLOWERS

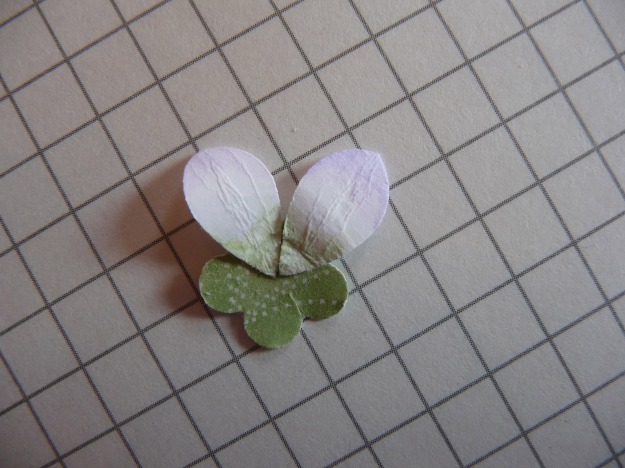
Cut a strip 1″ x 6″ strip of Whisper White card stock, fold in two lengthwise, then place in the punch as shown in the following illustration. Mark the position with a coloring pencil directly on the punch to make sure all petals are similar in size and shape.

With a blender pen, color larger tip of the petal with Lavender Lace, then the other tip with Certainly Celery.

When dry, curl each petal. Make a flower base by punching a small flower with the Flower Trio Punch, snip each petal in a little further toward the center so that they can follow the curve of the white petals.

Adhere a white petal, over each one of the 5 petals of the small flower base. Then adhere the micro bead flower center with a drop of Crystal Effects.

If you look closely at the petals on my card, you will see that I snipped off the tips just a little in an uneven way for a more natural look, but that is really optional. For the opening bud, I used only 4 petals, and 2 sections of the small flower base.

I hope these instructions will incite you to make your own ‘bird-punch’ flowers and to experiment further with this fun punch. If I have left out something, or if you have any questions, just let me know in the comments section and I’ll be glad to help.

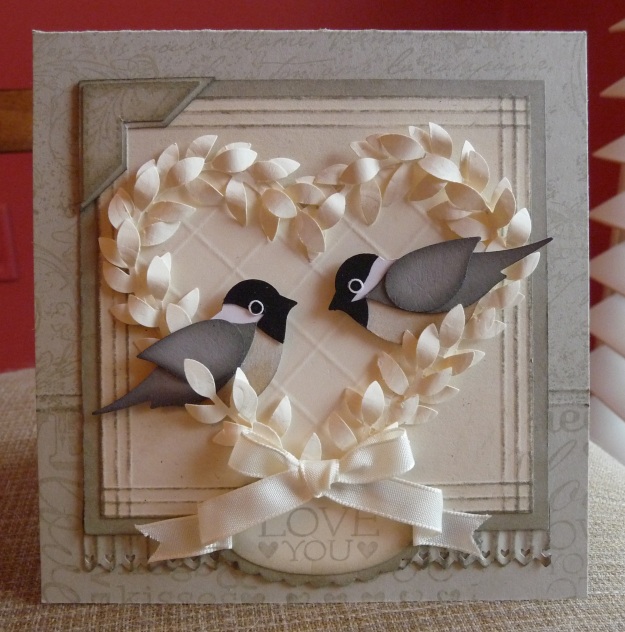
Romantic Chickadees for Valentine’s Day

Last weekend I had a very rare visit in my backyard. When my husband told me my chickadee was “out there”, I thought he was making fun of the paper chickadees that can be found here and there in our house lately, but it was no joke. For the first time in the 6 years I have been living in western Tennessee, I have seen 2 black-capped chickadees. At first there was only one on a branch, then another flew in and they started flying acrobatically in circles and dips as if they were playing tag. Not only are they cute and have the most cheerful chirp, I had forgotten how playful they are. They certainly are tough little guys too, because they came right after the ice storm and one of our very rare snowfalls. On her blog and in reference to my cards, Anne Matasci, The Maui Stamper, mentions that chickadees are very faithful to their counterparts. Certainly, following a mate so far away from the regular territory is testimony to their bond. All of a sudden I saw a romantic side to these cute little birds and decided to make yet another chickadee Valentine’s Day card, one that would ooze romance.

As usual, supplies and instructions for this card are right under this photo, but click here or on the chickadee in the side-bar to download and print the instructions to make the chickadee.

Card stock: Sahara Sand, Naturals Ivory, Very Vanilla (+ chickadee colors)

Jumbo Stamping wheels: I {love} love (117084), Very Vintage (117693)

Ink: Sahara Sand (+chickadee colors)

Accessories: Very Vanilla Taffeta ribbon

Punches: X-Large Two-Step Bird (117191), Pinking Hearts Border (117649), Large Oval (107305), Scallop Oval (114889), Photo Corners (109042)

Other tools and supplies: bone folder, paper cutter, crimper, stylus, sponge daubers, Tombo glue, mini glue dots, snail adhesive

The card is 5″ x 5-1/4″ in Sahara Sand (card stock was cut 5″ x 10-1/2″). The front is stamped with both wheels mentioned above. Two score lines 1/8″ apart separate the 2 different patterns. The heart is cut out of Very Vanilla and scored with the use of the paper cutter and a bone folder. Click here to download the HEART TEMPLATE WITH SCORING LINES. The leaves are punched in Very Vanilla with the bird punch. The stems were trimmed and leaves were curled by pressing and pulling between the thumb and the small end of a stylus. I used Tombo glue to adhere them to the heart. The finished size of the first mat in Naturals Ivory is 3-7/8″ x 3-3/4″, although I initially cut it 4-7/8″ x 4-3/4″ to make scoring of the edges easier. The first score line is at 1/2″ from the edges, then I scored 2 more lines 1/8″ apart. I then cut the mat close to the first score line and inked the raised lines with the ink pad. The second mat is 4-1/8″ x 4-1/4″ in Sahara Sand, with edges sponged in Sahara Sand . The decorative trim at the bottom of the mat is a 1″ strip of Sahara Sand that was passed through the crimper, punched with the Pinking Hearts Border punch, and sponged with Sahara Sand. The greeting on the oval label is from the I {love} love wheel stamped on Very Vanilla. I blocked off the images around that greeting on the wheel with painter’s tape. The greeting was punched out with Large Oval punch and the edges were sponged. The scallop oval is Sahara Sand sponged with Sahara Sand. The small photo corner was stamped with the Very Vintage wheel and sponged around the edges, then glued on top of the large photo corner that was trimmed and also sponged. The bow was made with long ends that were folded twice. On each bow end, I put a glue dot inside the 2nd fold, then another under that same fold to adhere the bow end to the card. It was the best way I could secure the ends to the card but still have them look like they loosely fall from the bow. Hope this is clear… wish I had a good camcorder to demonstrate this.

Chickadee Reciprocal Love Valentine’s Day Card

I wanted to make a more masculine version of my chickadee Valentine’s Day card, and to use the punch’s branch this time. I hesitated about using two hearts. It looked quite nice with just one bird giving, the other receiving, but in the end it was the math lesson I was giving to my son that day that made me tip this way. It was all about reciprocal numbers and fractions. How unromantic, I know, but that is how the name of this card, the reciprocal giving, and the reciprocal colored hearts worked their way into this project. Inspiration comes in many ways…even from math! But don’t these two look like they are really in love?

Instructions for the card are right under the picture, but for instructions and supplies to make the birds, click on the chickadee in my sidebar.

Card stock: Sahara Sand, Naturals Ivory, Kraft, Pretty in Pink, Real Red
Stamp sets: Tiny Tags (mini catalog), Teeny Tiny Wishes
Ink: Real Red, Chocolate Chip
Punches: X-Large Two-Step Bird (mini catalog), Word Window, Modern Label
Dies: Beary Lovely (mini catalog), Punch Windows Movers & Shapers (for Modern Label mat)
Tools and Accessories: Big Shot, Crop-a-dile, linen thread, antique brass metallic brads.

The card is 4-1/4’’ x 5-1/2’’ (Sahara Sand), the mat is 4’’ x 5-1/4’’ (Naturals Ivory), and the branches are punched in Kraft card stock. Birds are mounted on card with dimensionals. Pink heart was stamped with one of the leafy images from the Tiny Tags in red. Greeting is stamped on Naturals Ivory in Chocolate Chip ink, then punched with Word Window punch. It is then layered on a Sahara Sand modern label, which is then layered over the coordinating Windows Movers & Shapers label in Naturals Ivory. Eyelets are set in with Crop-a-dile.

Valentine’s Day Chickadee with Bird Punch

This card is very quick and easy to make, once the chickadee is made that is. For a list of supplies and detailed instructions on HOW TO MAKE THE CHICKADEE, CLICK HERE. The list of supplies and instructions for the rest of the card are found below.

Stamp Sets: Well Scripted, Tiny Tags (Occasions Mini, p 19, 28)
Cardstock: Very Vanilla, Naturals Ivory, Kraft, Real Red, Pretty in Pink
Classic Ink Pad: Chocolate Chip, Real Red
Punches: Two-Step Bird Punch, (Occ., p 10), Scallop Trim Corner (Occ., p 11), Scallop Trim Border (Sale-A-Bration, p 9)
Dies: Birds & Branches Decorative Strip (p 196), Beary Lovely (Occ., p 39)
Tools: Big Shot, Extended Space Platform, Decorative Strip Cutting Pads, Bone Folder

Cut a piece of Very Vanilla 8-1/2″ x 5-23/32″ –just a tad shorter than 5-3/4″– (21.6 cm x 14.5 cm). These exact measurements are important to make sure the scallops punch nicely all around the edges. Punch all four corners with the scallop corner punch, with the back side of the punch facing you to make sure the card stock is lined up properly. Punch the sides with the Scallop Trim Border, using the printed guides on the punch for proper positioning. Score card stock lightly, fold and line up scallops before fully pressing down the fold with your bone folder. Cut piece of Naturals Ivory 4″ x 5-1/4″ (10.2 cm x 13.4 cm), stamp greeting on lower right corner. Die cut the branches with the decorative strip die in Kraft, and 2 layers of the heart with the Beary Lovely Die in Real Read and Pretty in Pink. Stamp flourish design from Tiny Tags on heart in Real Red. Mount all the die cuts and the chickadee on to the Naturals Ivory mat, then glue the mat to the scalloped base of the card.