My creative moments may have been few and far between lately, but I did manage to work on 3 fun projects that I’m hoping to have time to share with you over the next few days. I have definitely become obsessed with the 2-step bird punch, and I just keep finding new ways to use it. Below, you will find instructions on how I made the shamrock and flowers with that favorite punch of mine, but first let me give you the list of supplies and the basic instructions for the card.
Stamp Set: Teeny Tiny Wishes
Paper: Certainly Celery CS, Whisper White CS, Certainly Celery Designer Paper
Ink: Certainly Celery, Green Garden, Chocolate Chip, and Lavender Lace pads, plus the Certainly Celery re-inker to stain the micro beads
Accessories: XL 2-step bird punch, flower trio punch, scallop trim border punch, Perfect Polka Dot embossing folder, Big Shot, micro beads, blender pen, sponge daubers
CARD
Emboss a piece of 3-1/2″ x 4-3/4″ Certainly Celery card stock with the embossing folder and Big Shot, then sponge the edges in Certainly Celery. Cut a 5/8″ x 4-1/2″ strip of Certainly Celery, punch with the Scallop Border Trim punch, then sponge, adhere it to the bottom of embossed mat, and trim sides. Adhere the mat to a 4-1/4″ x 5-1/2″ card. Cut a piece of Whisper White card stock 3-3/4″ x 2-7/8″, stamp greeting in Chocolate Chip and decorate with the punched elements.
If you are making the flower, prepare the beaded centers now. Tint about 1/2 tsp. of beads with 1 drop of Certainly Celery ink, mixing well. Then mix half the beads with just enough Crystal Effects so that the beads all clump together. Pick up small clumps, the size of the flower center you want, and transfer them onto a piece of parchment paper. I used my hobby blade to do this. Sprinkle more beads over these small mounds and very gently press them in. By the time you finish the shamrock and flower, the centers will be firm enough to handle but work carefully, they are not completely hardened. Just adhere one to the center of the flower with a small drop of Crystal Effects. You will have enough for a few more flowers.
SHAMROCK
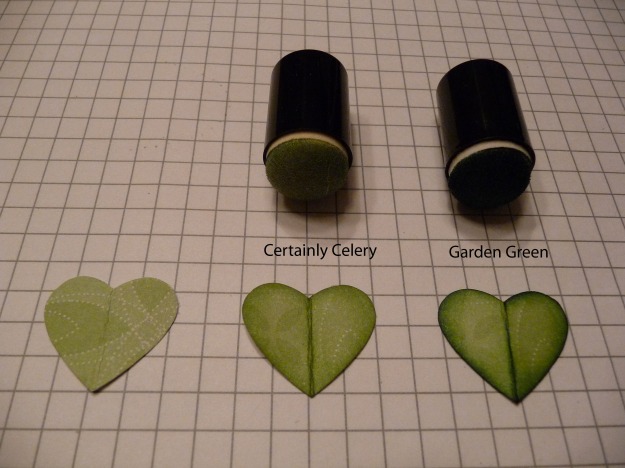
Cut a strip of Certainly Celery Designer Paper about 1-1/2″ x 4″, fold in two lengthwise, then place in the punch as shown in the following illustration and punch 3 heart shapes. Sponge each ‘heart’ with Certainly Celery, then Garden Green. Punch a few branches to make the shamrock and flower stems in the same designer paper. I sponged the stems as well.
WHITE SHAMROCK FLOWERS
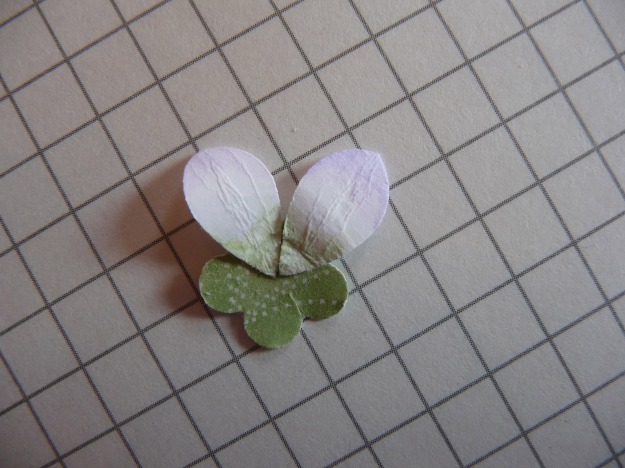
Cut a strip 1″ x 6″ strip of Whisper White card stock, fold in two lengthwise, then place in the punch as shown in the following illustration. Mark the position with a coloring pencil directly on the punch to make sure all petals are similar in size and shape.
With a blender pen, color larger tip of the petal with Lavender Lace, then the other tip with Certainly Celery.
When dry, curl each petal. Make a flower base by punching a small flower with the Flower Trio Punch, snip each petal in a little further toward the center so that they can follow the curve of the white petals.
Adhere a white petal, over each one of the 5 petals of the small flower base. Then adhere the micro bead flower center with a drop of Crystal Effects.
If you look closely at the petals on my card, you will see that I snipped off the tips just a little in an uneven way for a more natural look, but that is really optional. For the opening bud, I used only 4 petals, and 2 sections of the small flower base.
I hope these instructions will incite you to make your own ‘bird-punch’ flowers and to experiment further with this fun punch. If I have left out something, or if you have any questions, just let me know in the comments section and I’ll be glad to help.


Ann, I really like your card and hope that you do not mind that I have posted it on my blog. I gave you full credit and linked them back to your blog. Please let me know if there is a problem and I will remove it from my blog.
Oh, thank you so much, Norma! By the way, I love all the fun creative ideas on your blog!
Hi Ann,
This is maybe my favorite St. Patrick’s Day card ever!!! May I have your permission to CASE this fabulous card?
Peace, Love & Joy,
Joyce
peaceloveandjoyce.typepad.com
Oh yes, please do, Joyce. Thanks so much for your interest in my card!
It’s wonderful to use punches other than the way they were designed for…
This is gorgeous! I found you through Chera West’s case of your card. So beautiful and your tutorial is wonderful!
I’m constantly amazed by people’s creativity, I usually CASE. Thanks for giving me another use for the bird punch. I love the tutorial – seems simple enough – until I try it 🙂
So so pretty! Thank you for sharing your technique. 🙂
Beautiful card. Thank you for the detailed instructions. I came to your blog via SC and Patty Mickle’s blog. I am going to give this a try. Have a wonderful day!
Love your shamrock card, so clever!
Your work is amazing. so clever
Oh, my goodness! You are soooo talented! You definitly look outside the box, and I’m so glad you do. The birds and flowers are just WONDERFUL. I hadn’t intended on getting that punch, but am reconsidering it now. TFS.
I just love what you do with that bird punch! It amazes me the ideas you come up with! TFS
Hi Ann,
I came to your blog via your comment on the baby card that I made with the stamp set, ‘A Good Egg’. First, so glad you are getting that stamp set ;-D, that little chick is too adorable. Second…. WOW!!!! I LOVE the cards on your blog. They are GORGEOUS! You are very talented with a punch! Adding your blog to my favs and hope to make some of those precious little chickadees as soon as I get the bird punch. Have a great day!
Barb
wow great use of a punch not intended for flowers…talented thinking! Valita
Hi Ann,
This is the prettiest St. Patrick’s Day card I have seen yet. Thanks for the tutorial. I am definitely going to try the flowers. They are gorgeous.
Ann,
This is fantastic card. The flower is beautiful.
Oh my goodness, Ann! Love it, Love it!!
You have such a talent and I can’t wait to make one of these!
Absolutely gorgeous, Ann!